
Video Walkthrough #
Logging in to Webtime & Updating Your Password #
Use Webtime on your phone or tablet app to enter both time and expenses.
- You’ll receive your login credentials via email from support@raiserecruiting.com.
- Go to connect.ianmartin.com, select Time and Expense Entry.
To change your password:
- Tap the “hamburger menu” (three horizontal lines) in the upper left-hand corner

- Choose Preferences, then Update Password
- Next to Current, enter your current password in the first field. Next to New, enter the new password of your choice. Next to Confirm, enter your new password again to make sure you got it right.
- Tap Update Password.
Webtime is also used for submitting expenses.
[maxbutton id=”31″ url=”/knowledgebase/webtime-expenses/” text=”SEE EXPENSE INSTRUCTIONS HERE” ]
Creating a New Timesheet #
- On the home screen, to the right of My Timesheets, tap the “+” icon.

- A new screen will appear.
- Next to Period, tap the box to enter a starting date (e.g., for that week)
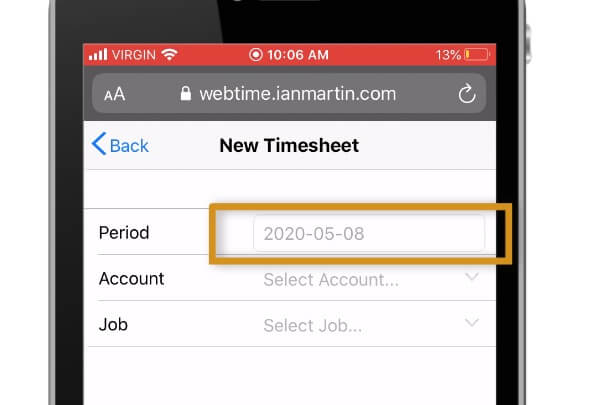
- A calendar will appear. Tap on the starting date you want to record time for.
- Next to Account, tap the box to select the client you’re entering hours for. The client company (or companies if you have multiple clients) should appear in a drop-down list.

- Next to Job, tap the box to enter the role you’re entering time for.

- Your role or roles (if you have multiple placements) should appear in the dropdown list.
- If you’re approved to submit expenses, you will see a job that starts with “EXP” (for expenses). Select the “job” that starts with EXP to submit expenses.
- When you’ve entered the Period, Account, Job – tap Continue.
Entering Hours on Your New Timesheet #
- You should see your new timesheet with the Job and Date you just entered.
- To enter time for one day, tap the “+” to the right of Timesheet.

- Tap the box next to Date to enter time for one day.

- Tap the box next to Pay Type to specify the pay type from the dropdown options, e.g., Regular Time, Overtime, Different Shift, etc.
- If you are unsure about which pay type to select, please reach out to us at support@raiserecruiting.com.

- Use the Pay Type field to record if you worked a statutory holiday.
- If you did not work on a statutory holiday, do not enter the time – enter 0 hours. Accrued holiday pay (for contract employees) is automatically handled through payroll.
- Next to Hours, tap the box to enter the number of hours you worked on that day.

- Tap the box next to Comments if you want to add comments for your timesheet reviewer – e.g., if you were late or had to leave for an appointment. (optional)
- When have entered hours for that day, tap Done.

- Tap the “+” and repeat this process to enter time on each day you worked in that time period.
Saving Your Timesheet to Finish Later, or Submitting Your Timesheet for Approval #
- When you have entered your hours (e.g., for that day, or for that week), tap the “…” icon to either Save or Submityour timesheet.

- Tap Save to save the timesheet – e.g., to enter more time later.
- Tap Delete or Cancel to delete this timesheet and start over.
- Tap Submit to send your timesheet for approval.
Approvals:
- Your timesheet approver will receive an email notification from Webtime telling them that your timesheet is pending review.
- You will receive an email when your manager has approved your timesheet.
- If your manager rejects your timesheet or expense entry, you will receive a notification email. The email will contain the reason your submission was rejected. Click the link in the email to revise your timesheet in Webtime, and resubmit.
Contact your Contractor Success Team #
Still have questions? You can fill out this form, email a Contractor Success rep directly at support@raiserecruiting.com, or call us at 1-844-836-3662.